Dental Extraction Instruments & Techniques: A Complete Guide
Medi Study Go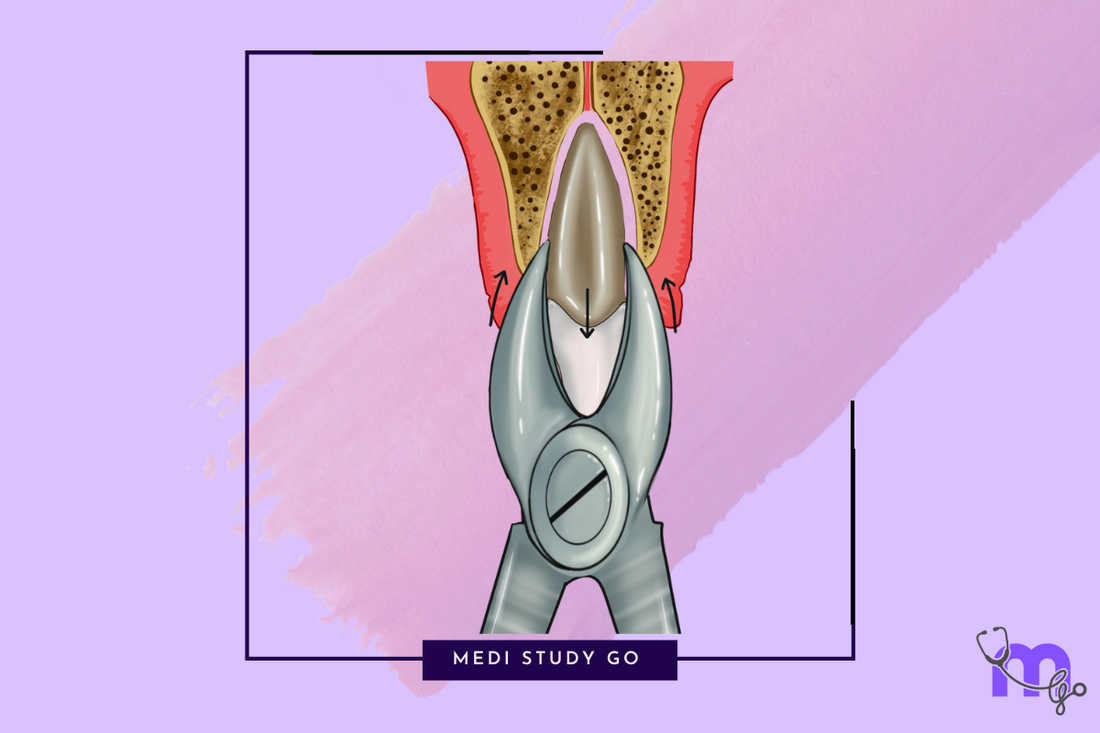
Related Resources
- Comprehensive Guide to Exodontia: Principles, Procedures, and Best Practices
- Complete Guide to Indications and Contraindications for Tooth Extraction
- Surgical Extraction Procedures: A Comprehensive Guide
- Managing Complications in Tooth Extraction
- Post-Extraction Care and Healing
Introduction
The success of tooth extraction procedures largely depends on the proper selection and use of instruments. This guide provides detailed information on extraction instruments and their applications, focusing on forceps and elevators, the workhorses of exodontia. Understanding these instruments and mastering extraction techniques is crucial for minimizing trauma and ensuring successful outcomes.
Instruments Used for Simple Extraction
1. Extraction Forceps
Extraction forceps are the primary instruments for grasping and removing teeth. Their design varies based on the specific teeth they are intended to extract.
Components of Forceps:
- Handle: The portion grasped by the operator, designed for optimal grip and force application
- Hinge: The joint connecting the two arms, allowing controlled opening and closing
- Beaks: The working end that contacts the tooth, shaped specifically for different teeth
Types of Extraction Forceps:
Maxillary Forceps:

| Forceps Number | Designed for | Distinguishing Features |
|---|---|---|
| #1 | Maxillary incisors and canines | Straight beaks with narrow blades |
| #53 | Maxillary premolars | Beaks angled at approximately 90° to handle |
| #150 | Maxillary molars (right) | Pointed beak for palatal root, broader beak for buccal roots |
| #150S | Maxillary molars (left) | Mirror image of #150 |
| #151 | Maxillary molars (universal) | Symmetric beaks for both sides |
| #210S | Maxillary third molars | Beaks are short with a more acute angle |
Mandibular Forceps:

| Forceps Number | Designed for | Distinguishing Features |
|---|---|---|
| #151S | Mandibular incisors | Narrow blades positioned in a line with handle |
| #203 | Mandibular premolars | Beaks aligned with handle axis |
| #222 | Mandibular molars | Beaks form a near right angle with handle |
| #23 | Mandibular third molars | Specialized beaks for accessed limited areas |
Special Purpose Forceps:
| Forceps Type | Designed for | Distinguishing Features |
|---|---|---|
| Cowhorn (#16) | Mandibular molars | Pointed beaks that fit into bifurcation |
| Root forceps (#301) | Root remnants | Narrow, pointed beaks to grasp roots |
| Pediatric forceps | Primary teeth | Smaller size with appropriate angulation |
2. Elevators

Elevators are used to luxate teeth, expand alveolar bone, and separate periodontal ligament attachments before forceps application. They function based on the principles of wedging, lever action, and wheel and axle mechanics.
Types of Elevators:
Straight Elevators:
- Examples: #301, #34, Coupland's
- Uses: Initial luxation, expanding socket, removing root fragments
- Features: Straight blade with concave surface
Angular Elevators:
- Examples: Cryer, Winter, Potts
- Uses: Leveraging roots, accessing interdental spaces
- Features: Angled blade for specific access points
Apexo Elevators:
- Uses: Removal of root tips and small fragments
- Features: Small working end for precision
Periosteal Elevators:
- Examples: Molt, Woodson, Freer
- Function: Reflecting mucoperiosteal flaps during surgical extractions
- Features: Broad, thin blade for clean tissue reflection without tearing
Classification and Uses of Elevators in Exodontia:
-
Based on Design:
- Straight elevators (Coupland's, #301)
- Triangular elevators (Winter's)
- T-shaped elevators (Cryer's, Potts)
- Paired elevators (Miller's)
-
Based on Function:
- Luxating elevators - separate PDL and create space
- Wheel and axle elevators - use rotational forces
- Lever elevators - use lever principles for extraction
-
Based on Application:
- Fragment elevators - specialized for root removal
- Cross-bar elevators - provide mechanical advantage
- Apical elevators - access root tips
3. The Function of Periosteal Elevators
Periosteal elevators play a crucial role in surgical extractions:
- Primary Function: To reflect and retract the mucoperiosteal flap, exposing the underlying bone
-
Design Features:
- Sharp working end for initial incision into periosteum
- Broad, flat blade for clean tissue reflection
- Smooth edges to minimize tissue trauma
- Ergonomic handle for control and stability
-
Technique for Use:
- Insert the sharp end at the gingival margin
- Apply firm but gentle pressure to separate periosteum from bone
- Use smooth, continuous movements to avoid tissue tearing
- Maintain close contact with bone during reflection
- Use the broad end for retraction during the procedure
-
Common Types:
- Molt No. 9 periosteal elevator - most commonly used
- Woodson periosteal elevator - finer tip for delicate areas
- Freer periosteal elevator - double-ended with different tip designs
4. Additional Instruments for Extraction
- Surgical Curettes: For socket debridement after extraction
- Rongeurs: For removal of bone and root fragments
- Surgical Scissors: For tissue incision and trimming
- Needle Holders: For suturing after surgical extractions
- Retractors: For improved visibility and tissue protection
- Surgical Handpieces and Burs: For bone removal in surgical extractions
Proper Handling and Use of Extraction Instruments
How Extraction Forceps Are Held and Used Correctly
The proper use of forceps is critical for successful extractions with minimal trauma:
Correct Grip and Positioning:
-
Basic Grip:
- Place the thumb on one handle and fingers on the other
- Index finger may extend toward the beaks for greater control
- Maintain a firm but not excessive grip
-
Wrist and Arm Position:
- Keep wrist stable during force application
- Use forearm rotation for controlled movements
- Maintain proper body position for leverage
-
Beaks Adaptation:
- Position beaks parallel to the long axis of the tooth
- Maxillary forceps: one beak palatally, one buccally
- Mandibular forceps: one beak lingually, one buccally
- Insert beaks as far apically as possible without traumatizing bone
-
Force Application:
- Initial force: light and controlled
- Progressive increase in force as tooth begins to move
- Avoid sudden excessive force that may fracture tooth
Movement Patterns for Different Teeth:
Maxillary Teeth:
- Incisors and Canines: Labial-palatal rocking with slight rotational movements
- Premolars: Buccal-palatal rocking with minimal rotation
- Molars: Primarily buccal-palatal rocking (rotation contraindicated)
Mandibular Teeth:
- Incisors: Labial-lingual rocking with slight rotation
- Premolars: Buccal-lingual rocking with limited rotation
- Molars: Buccal-lingual rocking movements (no rotation)
Proper Use of Elevators:
-
Hand Position:
- Hold like a pen for precise control
- Index finger extended along the shaft for stability
- Thumb provides directional control
-
Fulcrum Establishment:
- Use adjacent teeth or bone as fulcrum
- Never use mobile teeth as fulcrums
- Protect soft tissues when establishing fulcrum
-
Force Application:
- Apply force in a controlled, deliberate manner
- Avoid excessive force that may damage bone or adjacent teeth
- Rotate elevators slightly to expand socket
Steps of Routine Forceps Extraction
A methodical approach to extraction ensures predictable outcomes and minimizes complications:
1. Preparation Phase
- Patient Positioning: Upright for maxillary extractions, reclined for mandibular extractions
- Operator Positioning: Standing position that allows proper visibility and access
- Anesthesia: Adequate local anesthesia with proper technique
- Instrument Selection: Choose appropriate forceps and elevators based on tooth morphology
2. Syndesmotomy (Periodontal Ligament Detachment)
- Use a straight elevator or periosteal elevator to sever the periodontal ligament
- Insert the instrument into the periodontal space
- Apply gentle pressure to break initial attachments
- Work circumferentially around the tooth
3. Forceps Application
- Select appropriate forceps based on tooth anatomy
- Position beaks parallel to long axis of tooth
- Ensure beaks are positioned below the cervical line
- Adapt beaks to tooth surface without pinching gingiva
4. Luxation and Delivery
- Begin with gentle, controlled movements
- Apply appropriate directional forces based on root anatomy:
- Buccal-lingual/palatal movements for most teeth
- Rotational movements for single-rooted teeth when appropriate
- Slow, progressive increase in force as tooth mobility increases
- Maintain apical pressure to prevent root fracture
- Continue movements until tooth is sufficiently mobile
5. Tooth Removal
- Extract tooth along its path of least resistance
- Control the movement to prevent damage to opposing arch
- Inspect socket and extracted tooth for completeness
6. Socket Management
- Compress socket walls gently to minimize post-extraction bone loss
- Remove any granulation tissue with surgical curette
- Irrigate socket to remove debris
- Place gauze for hemostasis
- Consider suturing when necessary
Mechanical Principles of Tooth Extraction
Understanding the biomechanics of tooth extraction helps in applying the correct forces and techniques:

1. Expansion of the Bony Socket
- Controlled lateral force expands the elastic alveolar bone
- Creates space between tooth root and socket wall
- Most effective in younger patients with more elastic bone
- Less effective in elderly patients with denser bone
- Success factors:
- Sufficient tooth structure for forceps grip
- Root pattern and socket dilation
- Bone elasticity (decreases with age)
2. Use of Lever and Fulcrum
- Elevators function as first-class levers
- Force application point determines mechanical advantage
- Fulcrum should be on healthy bone or stable teeth
- The line of withdrawal is determined by root pattern
- Principles:
- Force direction follows path of least resistance
- Adjacent tooth can serve as fulcrum point
- Applied force should be controlled to prevent damage
3. Insertion of Wedge or Wedges
- Elevator serves as a wedge between tooth and bone
- Creates space and breaks periodontal attachments
- Wedge principle applications:
- Luxation of roots
- Expansion of socket
- Displacement of tooth
- Technique considerations:
- Insert parallel to long axis of root
- Rotate to create space
- Apply controlled pressure
Conclusion
Mastery of extraction instruments and techniques is fundamental to successful exodontia. The proper selection, handling, and application of forceps and elevators, combined with understanding of biomechanical principles, allows for efficient extractions with minimal trauma.
For dental students preparing for the NEET MDS exam, understanding these principles and techniques is essential for both theoretical knowledge and clinical competence. Regular practice with proper supervision will help develop the tactile skills necessary for successful extractions.
Remember that each extraction is unique, and the ability to adapt these techniques to individual cases comes with experience and continued learning.