Manipulation Techniques for Dental Composites: Best Practices
Medi Study Go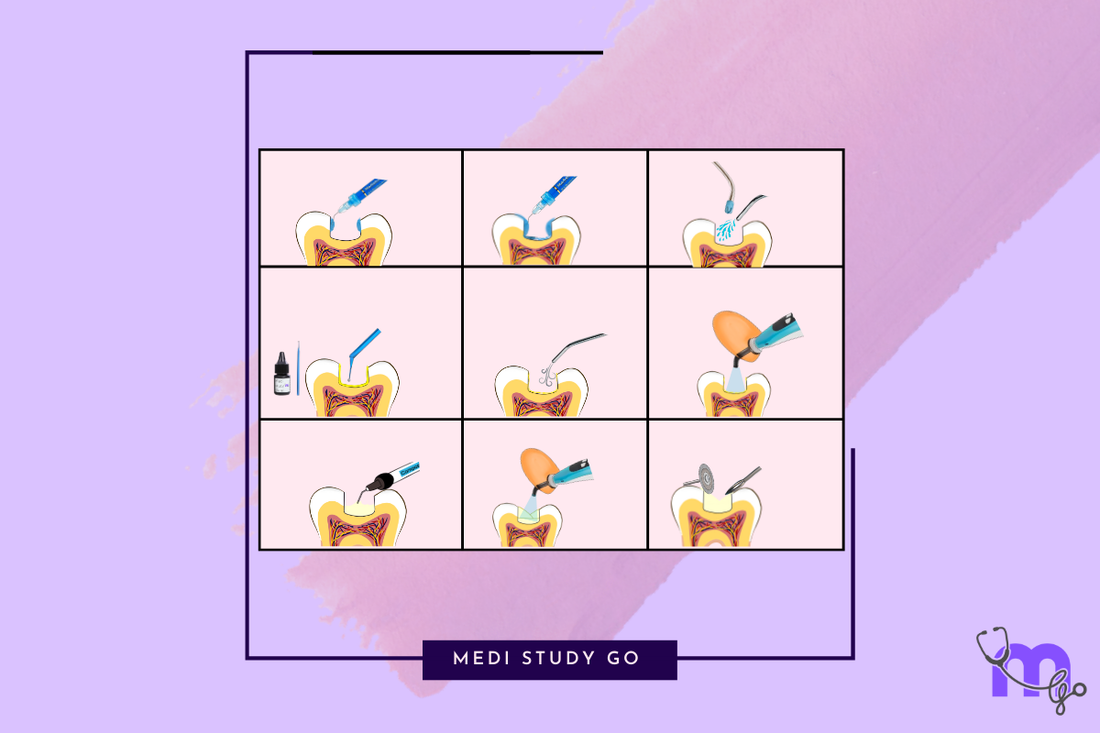
Proper manipulation of dental composites is crucial for ensuring longevity, aesthetics, and optimal performance of restorations. For NEET MDS aspirants and dental professionals, mastering these techniques is essential for both clinical success and examination preparation. This comprehensive guide provides detailed insights into the step-by-step approach to composite placement, finishing, and troubleshooting.
Explore our complete dental composites series:
Tooth Preparation for Composite Restorations
The foundation of a successful composite restoration begins with proper tooth preparation, which differs significantly from traditional amalgam preparation techniques.
Conservative Preparation Principles

Key Concepts:
- Removal of caries and unsupported enamel only
- Preservation of healthy tooth structure
- Minimal extension beyond defect
- Rounded internal line angles to reduce stress concentration
Benefits:
- Maximizes remaining tooth strength
- Supports the bio-mimetic approach
- Reduces risk of pulpal exposure
- Enhances longevity of both restoration and tooth
Cavity Design Considerations
For Anterior Restorations:
- Beveled enamel margins in anterior teeth (0.5-1mm, 45° angle)
- Better blending and improved bond strength
- Conservative approach to facial enamel
- Rounded internal line angles
For Posterior Restorations:
- Removal of undermined enamel
- Butt joint margins generally preferred
- Box-shaped preparations with rounded internal angles
- No need for retentive undercuts due to adhesive bonding
Finishing Enamel Margins:
- Bevel enamel margins in anterior teeth for better esthetics
- Enhances bond strength by exposing enamel prisms
- Reduces marginal staining and improves transition
- Creates larger bonding surface area
Isolation and Moisture Control
Effective isolation is perhaps the most critical factor in ensuring successful composite placement.
Rubber Dam Isolation
Advantages:
- Provides optimal moisture control
- Improves visibility and access
- Prevents contamination of bonding surfaces
- Protects patient from materials and instruments
Technique:
- Select appropriate clamp size and rubber dam material
- Punch holes in strategic locations
- Place clamp on anchor tooth
- Stretch dam over clamp and frame
- Floss interproximal areas to position dam correctly
Alternative Isolation Methods
Cotton Roll Isolation:
- Placed in vestibules and under tongue
- Changed frequently when saturated
- Less effective but sometimes necessary
- Often combined with saliva ejectors
Retraction Cord Placement:
- Essential for subgingival margins
- Place before bonding procedures
- Provides physical displacement of gingiva
- Assists with hemostasis and fluid control
Tips for Challenging Cases:
- Use of absorbent triangles or dry-angles
- Anti-salivary medications when appropriate
- High-volume evacuation techniques
- Consider split-dam technique for difficult areas
Bonding System Application
Proper application of adhesive systems is fundamental to success with composite restorations.
Total-Etch Technique
Steps:
- Apply 37% phosphoric acid to enamel (15-30 seconds)
- Extend to dentin (10-15 seconds maximum)
- Rinse thoroughly (minimum 15 seconds)
- Dry enamel to chalky white appearance
- Maintain slightly moist dentin (avoid desiccation)
- Apply primer if using multi-bottle system
- Apply adhesive with scrubbing motion
- Air-thin to evaporate solvent
- Light-cure according to manufacturer's instructions (typically 10-20 seconds)
Critical Factors:
- Enamel should appear frosty white after etching
- Dentin should be slightly moist ("moist bonding")
- Avoid pooling of adhesive
- Ensure complete solvent evaporation before curing
Self-Etch Technique
Steps:
- Apply self-etching primer to tooth surface
- Agitate/scrub for recommended time (typically 15-20 seconds)
- Air-thin gently to distribute material
- Apply bonding agent if using two-step system
- Air-thin again to create even layer
- Light-cure according to manufacturer's instructions
Critical Factors:
- More effective on cut than uncut enamel
- Consider selective enamel etching for optimal enamel bonds
- Follow manufacturer's specific instructions
- Avoid contamination between steps
Universal Adhesive Systems
Application Options:
- Total-etch mode
- Self-etch mode
- Selective-etch mode (enamel only)
Steps:
- Choose appropriate etching mode based on clinical situation
- Apply adhesive with active rubbing motion (15-20 seconds)
- Air-thin thoroughly to evaporate solvent
- Light-cure for recommended time
Advantages:
- Versatility in application methods
- Reduced inventory needs
- Compatibility with various materials
- Simplified technique
Common Bonding Errors and Solutions
Overdrying Dentin:
- Results in collapsed collagen network
- Compromises hybrid layer formation
- Solution: Rewet with water or rewetting agent
Undercuring Adhesive:
- Leads to inadequate polymerization
- Reduces bond strength
- Solution: Ensure proper light intensity and curing time
Acid Etching for Too Long:
- Causes excessive demineralization
- May lead to post-operative sensitivity
- Solution: Time etching carefully, especially on dentin
Inadequate Solvent Evaporation:
- Leads to weakened polymer network
- Results in reduced bond strengths
- Solution: Air-thin thoroughly before curing
Composite Placement Techniques
Different clinical situations call for specific placement approaches to maximize outcomes.
Incremental Layering Technique
Rationale:
- Reduces polymerization shrinkage stress
- Improves degree of conversion
- Ensures adequate curing of all material
- Allows for controlled build-up of anatomy
Technique:
- Place composite in 2mm or smaller increments
- Adapt each increment to cavity walls
- Light-cure each layer completely
- Build anatomical features progressively
- Final cure after completion
Critical Factors:
- Each increment must be adequately cured
- Avoid contamination between increments
- Anticipate final anatomy while building
- Consider C-factor (configuration factor) in placement strategy
Bulk-Fill Technique
Material Requirements:
- Specifically designed bulk-fill composites
- Increased translucency for deeper cure
- Modified initiator systems
- Reduced polymerization shrinkage stress
Technique:
- Place material in 4-5mm increments
- Ensure adequate adaptation to cavity walls
- Extended curing time (typically 20-40 seconds)
- Cap with conventional composite if required by manufacturer
Clinical Considerations:
- Verify depth of cure with manufacturer specifications
- Ensure adequate light intensity
- Consider curing from multiple angles in deep cavities
- Not suitable for all clinical situations
Centripetal Build-up Technique for Class II Restorations
Technique:
- Place sectional matrix and wedge
- Build proximal wall first with initial increment
- Transform Class II into Class I configuration
- Complete restoration using incremental or bulk-fill approach
- Remove matrix after completion
Benefits:
- Better control of proximal contour
- Improved contact formation
- Reduced risk of voids at gingival margin
- Simplified matrix removal
Stratification Technique for Anterior Restorations
Layers:
- Opaque/Dentin Layer: Placed on the lingual aspect
- Body/Dentin Shade: Forms the bulk of the restoration
- Enamel Layer: Higher translucency, placed on facial aspect
- Effects: Optional incisal, white, or blue effects for characterization
Benefits:
- Creates depth and vitality in restoration
- Mimics natural tooth optical properties
- Enhances esthetic outcome
- Allows customization for individual patients
Matrix Systems and Contact Formation
Proper matrix selection and placement is crucial for establishing correct anatomical form and contacts.
Anterior Matrix Systems
Types:
- Clear plastic matrix strips
- Mylar strips
- Contoured anterior matrix systems
Placement Tips:
- Secure with wedges or finger pressure
- Contour before polymerization
- Consider dual matrix for complex cases
- Verify contour from all angles before curing
Posterior Matrix Systems
Traditional Circumferential Matrices:
- Tofflemire retainer and bands
- Universal application but challenging for tight contacts
Sectional Matrix Systems:
- Better for creating tight contacts
- Used with rings for separation
- Contoured for proper emergence profile
- Available in various heights and curvatures
Contact Formation Tips:
- Ensure proper wedging
- Use separation rings with sectional matrices
- Pre-wedging technique before matrix placement
- Burnish matrix against adjacent tooth
- Consider pre-contoured matrices
Light Curing Techniques
Proper polymerization is critical for the physical properties and longevity of composite restorations.
Light Curing Units
Types:
- LED curing lights (most common)
- Halogen curing lights (traditional)
- Plasma arc curing lights
- Laser curing systems
Essential Factors:
- Adequate light intensity (minimum 600-800 mW/cm²)
- Appropriate wavelength (~470 nm for most composites)
- Regular verification of output intensity
- Proper positioning and distance
Curing Protocols
Standard Protocol:
- Place light tip as close as possible to restoration
- Maintain 90° angle to surface when possible
- Cure for manufacturer's recommended time (typically 20-40 seconds per increment)
- Cure from multiple angles for posterior restorations
Advanced Techniques:
- Soft-start polymerization: Gradual increase in intensity
- Pulse-delay technique: Initial brief cure followed by delay and final cure
- Stepped curing: Incremental increase in intensity
- Trans-dental curing: Additional curing through tooth structure
Common Errors:
- Insufficient curing time
- Excessive distance from restoration
- Light contamination or damage
- Inadequate maintenance of curing unit
Finishing and Polishing
The final steps in composite placement significantly impact both esthetics and longevity.
Finishing Instruments
For Gross Contouring:
- Finishing diamonds (red or yellow band)
- Multi-fluted carbide burs
- Finishing strips for proximal surfaces
For Refining Contours:
- Fine-grit diamond burs
- Arkansas stones
- Rubber points and cups
Polishing Systems
Progressive Polishing:
- Medium abrasive discs/points
- Fine abrasive discs/points
- Extra-fine abrasive discs/points
- Final polish with paste or diamond polish
One-step Polishing Systems:
- Diamond-impregnated silicone points
- Multi-step abrasives in single instrument
- Final gloss enhancers
Technique Tips
Sequence:
- Check and adjust occlusion
- Establish general form and contour
- Smooth all surfaces progressively
- Create surface characterization if needed
- Final polish to high gloss
Critical Factors:
- Use adequate water cooling to prevent heat generation
- Follow sequence from coarse to fine
- Final curing after polishing for enhanced surface properties
- Verify margins and contours from multiple angles
Troubleshooting Common Issues
Understanding how to address common issues is essential for clinical success.
Air Bubbles/Voids
Prevention:
- Careful incremental placement
- Adapt material with appropriate instruments
- Avoid pulling or dragging material
- Consider flowable liner in complex areas
Management:
- Remove affected area
- Clean and rebond if necessary
- Replace with new increment
- Ensure proper adaptation
Poor Contacts
Prevention:
- Proper matrix selection and placement
- Use of separation rings
- Pre-wedging technique
- Sectional matrix systems
Management:
- Remove deficient restoration if necessary
- Re-establish proper matrix position
- Consider alternative matrix system
- Apply firm pressure during curing
Polymerization Shrinkage Issues
Prevention:
- Incremental placement technique
- Strategic curing directions
- Use of low-shrinkage materials
- Proper C-factor management
Management:
- Identify marginal defects
- Selective removal and replacement
- Repolishing of minor defects
- Consider alternative placement technique
Post-operative Sensitivity
Prevention:
- Proper dentin bonding technique
- Avoid dentin desiccation
- Adequate curing of adhesive
- Careful occlusal adjustment
Management:
- Occlusal adjustment
- Monitor for resolution
- Consider desensitizing agents
- Replacement if persistent
NEET Examination Tips for Composite Manipulation
For NEET MDS aspirants, composite manipulation represents a high-yield examination topic.
Key Areas to Focus On
- Step-by-step procedures for each type of restoration
- Troubleshooting common clinical problems
- Material-specific handling requirements
- Critical factors affecting success at each stage
- Comparison of different techniques and approaches
Common NEET Questions
- Proper etching times for enamel and dentin
- Incremental thickness limitations for conventional composites
- Identification of errors in technique descriptions
- Management of clinical complications
- Matrix system selection for specific situations
Study Strategies
- Create flowcharts for step-by-step procedures
- Practice explaining techniques in proper sequence
- Review NEET previous year question papers for technique-related questions
- Use flashcard technique for study of critical values and times
- Review visual resources showing proper technique
Conclusion
Mastering the manipulation of dental composites requires thorough understanding of material properties, meticulous attention to technique, and appreciation of the biological factors affecting success. For dental professionals and NEET MDS aspirants, these techniques form the foundation of successful restorative practice.
By understanding and implementing proper isolation, bonding, placement, and finishing protocols, practitioners can achieve predictable, esthetic, and durable composite restorations. This knowledge not only ensures clinical success but also forms a critical component of dental entrance examinations like NEET.
As composite materials continue to evolve, staying current with manipulation techniques and best practices remains an ongoing professional responsibility, ensuring optimal outcomes for patients and satisfaction for practitioners.
This comprehensive guide serves as an essential revision tool for NEET candidates focusing on restorative dentistry materials and techniques.